Your shopping cart is empty!
Our Catalogue
- Abrasive/Grinding/Polish
- Arts/Crafts
- Airbrushes/Compressors
- Cutters/Blades
- Finishing/Cleaning Products
- Flexible Shafts
- Framing
- Glue Guns/Wood Burning Pens
- Mats
- Rotary Mini
- Rulers
- Scissors
- Wood Turning Chisels/Lathes
- Batteries
- Blow Torches
- Clamps/Jigs
- Biscuits
- Cabinet Jigs/Instal Tools
- Clamps
- Band Strap Cord / Frame Clamp
- Bar Clamps
- C/G-Clamps
- Clamp Storage
- Corner Mitre / Angle Clamps
- Edging Clamps
- F-Clamps
- Guide Rail Clamps
- Lever Clamps
- Parallel Clamps / Revo
- Pipe Clamps
- Quick / Hand Clamps
- Sash Clamps
- Sets
- Spare Parts
- Special / Other Clamps
- Spring Clamps
- T-Tracks Face Pocket Hole
- Toggle / Bench Dog Clamps
- Dominoes
- Doweling
- Drilling Jigs
- Guides/Supports/Accessories
- Lock Mortising
- Magnets
- Nibblers/Shears
- Pocket Hole/Decking
- Router Jigs
- Sawing Jigs
- Spare Parts
- Square Chisel Mortiser
- Vices
- Workbench/Router Table
- Cutting/Sawing
- Drilling
- Fan Merchandise
- Hand Tools
- Chisels
- Edge Trimmers
- Electric Cable Joints/Clamps
- Files
- Glass Cutters
- Glue Applicators
- Grease Guns/Accessories
- Hacksaws
- Hammers/Axes
- Hand Saws
- Hand Stapler/Riviter/Tape Tool
- Hand Taper Reamers
- Impact Sockets
- Magnifiers
- Meter Sealing Tools
- Other Hand Tools
- Pipe Cutters/Deburring Tools
- Pliers
- Bent Nose Pliers
- Bolt Cutters
- Chain Lock Grip Pliers
- Circlip Pliers
- Combination / Fencing Pliers
- Diagonal/Side Cutters
- End Nippers
- Eyelet Pliers/Grommet Set Tool
- Flat Nose Pliers
- Lock Grip/Vice Grip Pliers
- Long Nose Pliers
- Revolving Punch Pliers
- Round Nose Pliers
- Sets
- Sheet Metal Pliers
- Tweezers
- Water Pump Pliers
- Wire Stripper
- Punches
- Scroll/Fret Saw Frame
- Snips/Shears
- Sockets
- Tool Belts/Pouches
- Tool Boxes/Trolleys/Kits
- Wood Plane
- Wrenches/Spanners
- Measuring/Marking
- Bore Gauges
- Caliper/Thickness Gauges
- Calipers
- Depth Gauges
- Gauge Block Sets
- Gauges
- Hardness Testers
- Height Gauges
- Indicators
- Laser Dist Meter/Range Finder
- Levels
- Line
- Marking
- Measuring Tool Sets
- Metal Detectors
- Micrometer
- Microscopes
- Pens/Pencils/Note Books
- Positioned Gauges
- Protractors/Squares
- Roughness Testers
- Rulers
- Scales
- Scribers/Penknife
- Specialised meters
- Straight Edges
- Tape Measures
- Merchandising
- Outdoors/Lifestyle
- Packaging
- Pneumatics
- Air Treatment
- Compressor Spares
- General
- Hose Fittings
- Power Tools
- Pressure Gauges
- Prevost System
- Pu Fittings
- Reels/Pipe/Hose/Tubing
- Spray Finishing
- Power Tools
- Cordless
- Electric
- Festool Spare Parts
- Router Bits
- Architectural Bits
- Bearings/Bushings
- Bull Nose
- Dish Carving
- Domino Cutters
- Door Making Bits
- Fluting/Beading
- Jointing Bits
- Louvre/Shutter Bits
- Plunge Cutting Grooving Bits
- Profiles
- Pulls/Handles
- Rabbeting Bits
- Reducing Sleeves/Collets
- Sets
- Slotting Bits
- Spare Parts
- Special Bits
- Spindle Cutters
- Straight Bits
- Trimming Bits
- Turn Over Knives
- Safety
- Screwing/Fastening/Fixing
- Bonded Anchors
- Cable Ties
- Direct/Manual Fastening System
- Facade Insulation Fixings
- Fasteners
- Foams/Sealants/Adhesives
- Lightweight Fixings
- Mechanical Anchors
- Passive Fire Protection System
- Roofing Insulation Fixings
- Screwdriving Systems
- Sharpening
- Specialist Aerosols
- Transport
- Unassigned
- Unknown
- Warranty
Brands
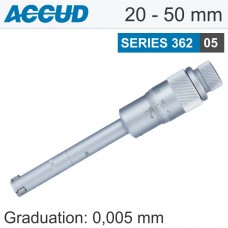
3 POINTS INSIDE MICROMETER SET 20-50MM (MICROMETERS INC. 20-25, 25-30,
Price: R47,505.24
Ex Tax: R41,308.90
Ex Tax: R41,308.90
Qty:
- OR -
Add to Wish List
Add to Compare
Add to Compare
3 Point Inside Micrometer set 20mm - 50mm
SERIES 362 - SET
SERIES 362 - SET
Complete set to measure a range 20mm up to 50mm. A precision measuring instrument designed to measure the internaldiameter of bores, cylinders, and other similar features with high accuracy. This tool is commonly used inengineering, machining, and quality control to ensurethat internal dimensions meet specified tolerances. Unlike traditional inside micrometers, the three-point contactsystem allows for more stable and reliable measurements, particularly in larger bores.
The set AC362-509-05 includes:
- Micrometers: 20 - 25mm, 25 - 30mm, 30 - 40mm, 40 - 50mm
- Full range of measurements: 20mm - 50mm
- Setting Rings included: Ø25mm and Ø40mm
- Extention Rod: 150mm
How it works:
- Three-point contact: The micrometer has three measuringpoints that evenly distribute pressure on the inner surface of the hole, ensuringaccurate and repeatable measurements.
- Digital display: The measured diameter is displayed digitally,eliminating the need for manual reading and reducing the possibility of errors.
- Extension rods: These can be used to measure deeper holes.
Applications
- Machining and Metalworking: Used to measure theinternal diameters of bores and holes in metal components, ensuring thatthey meet the required specifications.
- Quality Control: Essential in inspection processes toverify the accuracy of internal dimensions in manufactured parts.
- Engineering: Applied in various engineering tasks whereprecise internal measurements are critical, such as in the design andfabrication of mechanical parts.
- Automotive and Aerospace Industries: Used for measuringthe internal diameters of engine cylinders, bearing races, and othercritical components that require precise tolerances.
Advantages of Three-Point Micrometers:
- Improved accuracy: Ensures precise centering andmeasurement compared to two-point micrometers.
- Reduced measurement error: Minimizes the impact ofbore irregularities.
- Suitable for various shapes: Can be used for bothcylindrical and irregular bores.
Technical Specifications

Tags:
Inside Micrometer,
Micrometer

